The Fashionlush Handbook for Perfect Faux Tanning: Tips, Tricks, and Top Product Picks!
-
by fashion-world-blog
- 0

Let’s chat about fake tans—something I’m kind of an expert at. My obsession with getting a killer tan started when I was 13. I was in 7th grade and noticed all the cool girls had these pale playboy stickers peeking out from their low-rise jeans. I blew my entire paycheck from a donut shop on a monthly tanning membership, got a pale heart tattoo instead (since my mom would never allow a playboy sticker!), and became the queen of the double-dip, which is a tanning bed plus spray tan combo. Looking back, I was consistently an interesting shade of orange. Seriously, what was I thinking?
Thankfully, sunless tanning has come a long way, and so have my methods. I barely spend time in the actual sun and wouldn’t touch a tanning bed with a ten-foot pole. Sunless tanning is definitely the way to go, and after perfecting my faux tan over the years, I’ve gathered some tips to share!
The Fashionlush Guide to Faux Tanning
I’ve got three favorites when it comes to a faux tan: a custom airbrush tan, the spray tan booth, and my trusty DIY self-tanning routine at home. Let’s dive in.
1. Custom Airbrush Tan
I absolutely love a custom airbrush tan. If I have an important event, like being a bridesmaid or for my future wedding, that’s my go-to. I head to Blush Tan in San Diego, where they offer flawless organic custom airbrush tans. Although it costs a bit more, it’s completely worth it. With a custom airbrush, they spray you in a way that mirrors natural sunlight, and they can even do contouring for an amazing muscle definition. It’s the most natural-looking option out there.
2. Spray Tan Booth
Ah, the classic spray tan booth. Back in the day, I went overboard and ended up orange as a carrot, but that’s no longer an issue! Booth spray tans are perfect when I’m in a rush for a trip or event and need some color in a pinch. They’re fast, easy, and give me a dark tan without fail. I usually hit up iTan, which has locations everywhere, and get a mystic tan. They offer clear tans that develop over hours or the instant ones that keep developing over time. I like instant results, so I go for that. I just tell them I want to be dark, not orange, and for it to last. They customize the formula, and I’ve never been let down.
3. DIY Self-Tanning at Home
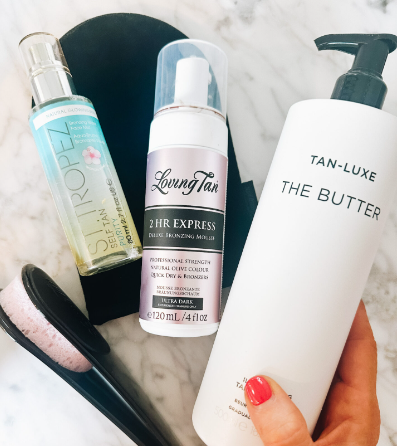
This is my weekly routine to keep my tan going strong. If I have a blog shoot or a party the next day, I do the tanning myself. People seem scared of DIY tanning, but it’s pretty foolproof once you get the hang of it. The key is using the right product. Right now, I love St. Moriz self-tanning mousse in DARK. It gives me the deep color I want without any orange, and the mousse application is super easy with a tanning mitt. Trust me, you don’t want tanned palms! When I’m in a hurry and need a quick touch-up, I use Glow Skincare’s instant airbrush self-tanner. It’s paraben-free, vegan, and provides a streak-free glow on short notice. Just a few sprays and I’m set!
Tanning Tips & Tricks
How long before an event should you tan? I usually spray tan the night before and shower in the morning. At most, I’ll do it two nights in advance, but any longer than that and your tan might start to fade and look patchy. Also, don’t tan the morning of an event or you may not achieve your preferred shade. Let it develop overnight for the best results.
Things to do before you tan: Whether you’re DIYing or going to a salon, always exfoliate with a good body scrub and moisturize to keep your tan even. If you need a manicure or pedicure, get it done before you tan. Always shave before tanning, as doing these after will remove your tan!
If you’re tanning yourself: Begin from the bottom up, starting with your legs. This way, you avoid weird creases in your tan. If you’re tanning your backside, either get a friend to help or use a tanning wand to reach tricky spots.
Let’s chat about fake tans—something I’m kind of an expert at. My obsession with getting a killer tan started when I was 13. I was in 7th grade and noticed all the cool girls had these pale playboy stickers peeking out from their low-rise jeans. I blew my entire paycheck from a donut shop on…
Let’s chat about fake tans—something I’m kind of an expert at. My obsession with getting a killer tan started when I was 13. I was in 7th grade and noticed all the cool girls had these pale playboy stickers peeking out from their low-rise jeans. I blew my entire paycheck from a donut shop on…